Ethereum Staking: A Step-by-Step Beginner’s Guide
A beginner-friendly guide that shows you how Ethereum staking really works, step by step.
What You’ll Learn
- What Ethereum staking means in simple terms
- How the staking process actually works behind the scenes
- Staking Methods: How They Work and Which Are Best for Beginners
- The core risks to be aware of before staking and how to avoid the common beginner traps
- Simple portfolio setups that help first-time stakers get started with confidence
Introduction
The first time most people hear about Ethereum staking, it sounds like a maze of validators, penalties, and technical rules. People often assume staking requires a technical background because the vocabulary feels intimidating. But behind those techie terms is something very simple: staking is earning rewards by helping Ethereum stay secure.
Today, more than 33 million ETH is already staked across over a million validators, showing how mature staking has become.
Most beginners get stuck on the terms, not the process. This guide breaks staking down in the way people actually learn staking, step by step, until everything feels clear enough to try on your own.
Table of Contents:
- What Is Ethereum Staking?
- How ETH Staking Works
- Staking Options
- Step-by-Step: How a Beginner Starts Staking ETH
- Risks Explained Simply
- Simple ETH Staking Portfolios for Beginners
- Mistakes Newbies Must Avoid
- Conclusion
What Is Ethereum Staking?
Ethereum staking is a way to support the network by locking up some of your ETH so the system can run securely. When you stake, Ethereum uses your deposit to help check transactions and keep the chain honest. In return, the network issues small rewards over time.
A simple way to picture it is this: staking is like letting Ethereum borrow your ETH to keep the network running, and it pays you interest for that help.
Once you understand these ideas, the rest of staking starts to make sense:
- Blockchain: a shared logbook everyone can read. Once something is added, it stays recorded.
- Validator: a digital security guard that checks transactions and keeps the logbook accurate.
- Stake: the ETH you lock to support the network and enable validators to do their job.
- Rewards: the ETH you earn in return for helping secure the system.
Staking gives Ethereum stability. The rewards you earn are your share of that contribution.
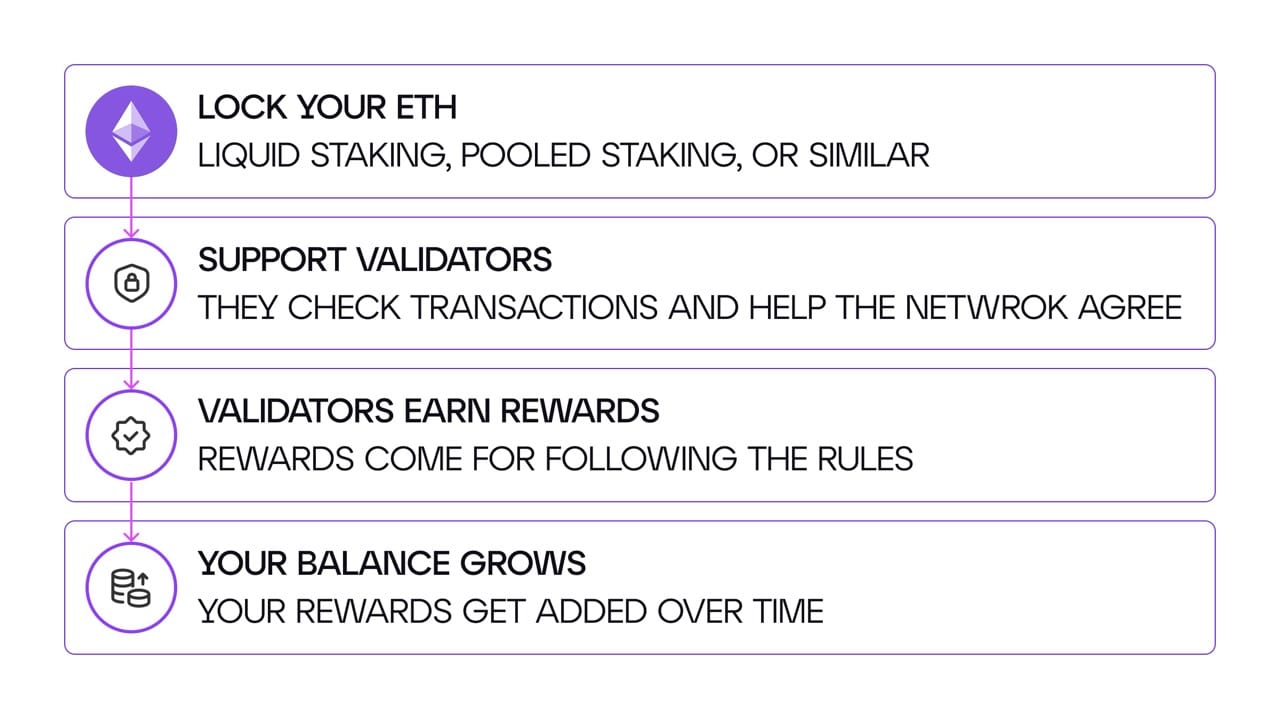
How ETH Staking Actually Works
Staking ETH comes down to a clear set of steps. Once you’ve set things up, the network does the rest. Here’s the flow in order:
1. You lock ETH.
You deposit some ETH into a staking method of your choice such as liquid staking (you receive a token), pooled staking (you stake with a group), or solo staking (you run your own validator).
2. Your ETH supports validators.
Validators check transactions and help the network reach agreement on what gets added to the chain.
3. Validators earn rewards.
As long as validators follow the rules and stay online, the network distributes small amounts of ETH as rewards.
4. Your balance increases.
Rewards are added gradually, raising your total holdings over time.
To see how the steps connect, here’s the full process mapped out visually:
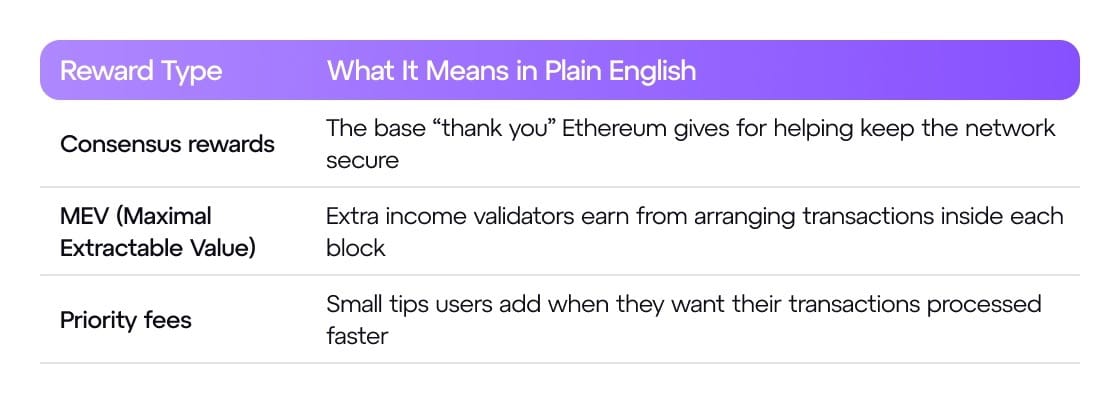
Where Do these Rewards Come From?
When you stake ETH, you earn rewards from a few different sources. Each one comes from activity happening on the network itself.
Why do rewards differ between services?
The percentage you earn isn’t fixed. It shifts based on how busy Ethereum is and how many validators are active. When more people stake, rewards get shared across a larger group, which lowers the average yield. Services also take small validator fees, which is why liquid staking, pooled staking, and solo staking may pay slightly different amounts. Most stakers see returns in the 3–4% range once everything is averaged out.
With that foundation in place, the next step is choosing the method that fits how you want to start.
Staking Options
Ethereum offers several ways to stake. Each comes with its own level of flexibility and responsibility. Here are the options most beginners see first, starting with the one used most widely today.
Option 1: Liquid staking
Liquid staking lets you deposit ETH into a protocol (an automated on-chain service) and receive a new token that represents your staked ETH, for example:
- stETH (Lido)
- rETH (Rocket Pool)
- cbETH (Coinbase)
This token earns rewards while staying usable in your wallet. You can hold it, swap it, or move it anytime, even though the underlying ETH remains staked in the background.
For most beginners, this is the simplest balance of flexibility and control.
Option 2: Pooled staking
Here, you can stake any amount of ETH and join a validator run by a professional operator. You do not receive a liquid token, your ETH simply earns rewards over time and the setup stays low-maintenance.
It’s a simple option if you want staking to work automatically without extra steps.
Option 3: Solo staking
Solo staking means running your own validator directly. It requires 32 ETH, a dedicated device, and consistent uptime.
You get full control and contribute directly to Ethereum’s decentralization, but the setup is technical and needs regular attention. It’s designed for people who want hands-on involvement in the network.
Option 4: Exchange staking
Many crypto exchanges (the platforms where people buy and sell crypto like ETH) let you stake with a single click. It’s convenient because the platform does the setup for you. Just remember, the exchange holds your ETH, not you.
It’s easy to use, but there are a few specific risks tied to this path — we’ll cover those in a next section.
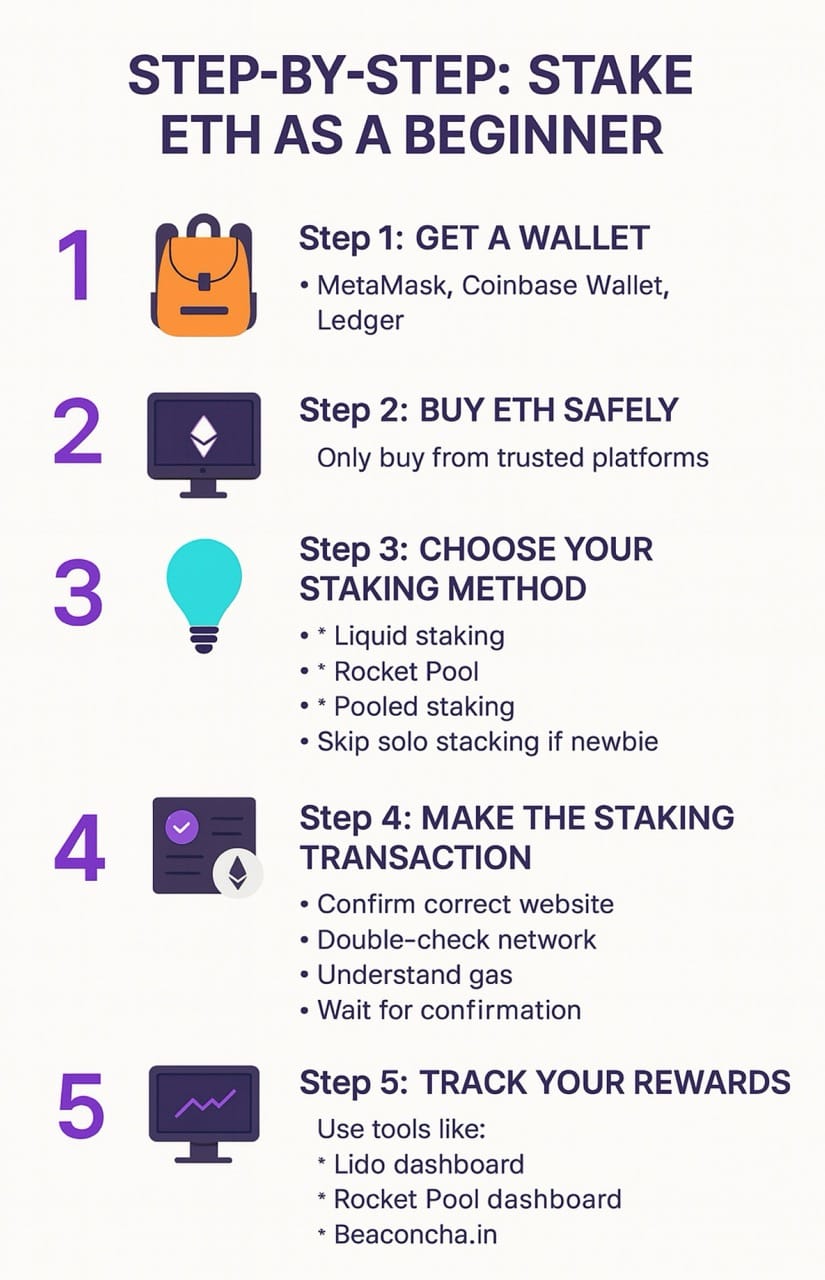
Step-by-Step: How a Beginner Starts Staking ETH
Now that the basics are clear, here’s how you can put them into action. Think of this as a path beginners commonly take when moving from learning to doing.
Step 1: Get a wallet
You need a wallet — your “crypto backpack” — to hold ETH and connect to staking services. Common beginner-friendly options:
- MetaMask
- Coinbase Wallet
- Ledger
They all work well for staking. Each lets you store your ETH securely and interact with staking platforms when you’re ready to start.
Step 2: Buy ETH safely
Purchase ETH on a trusted exchange like Coinbase or Kraken, then transfer it to your wallet.
Before sending, check the current gas fees (the network costs you pay to make a transaction on Ethereum). They change throughout the day, and moving funds at quieter times can save money.
Step 3: Choose your staking method
Here’s a simple way beginners decide where to start:
- Want the easiest setup with no lockups?
Choose liquid staking (stETH or rETH).
- Want your stake to help decentralize Ethereum directly?
Go with Rocket Pool (rETH).
- Want staking to run in the background without handling extra tokens?
Pick pooled staking.
- Just getting started?
Save solo staking for later.
If you’re unsure which option fits you best, this quick decision tree helps narrow it down.
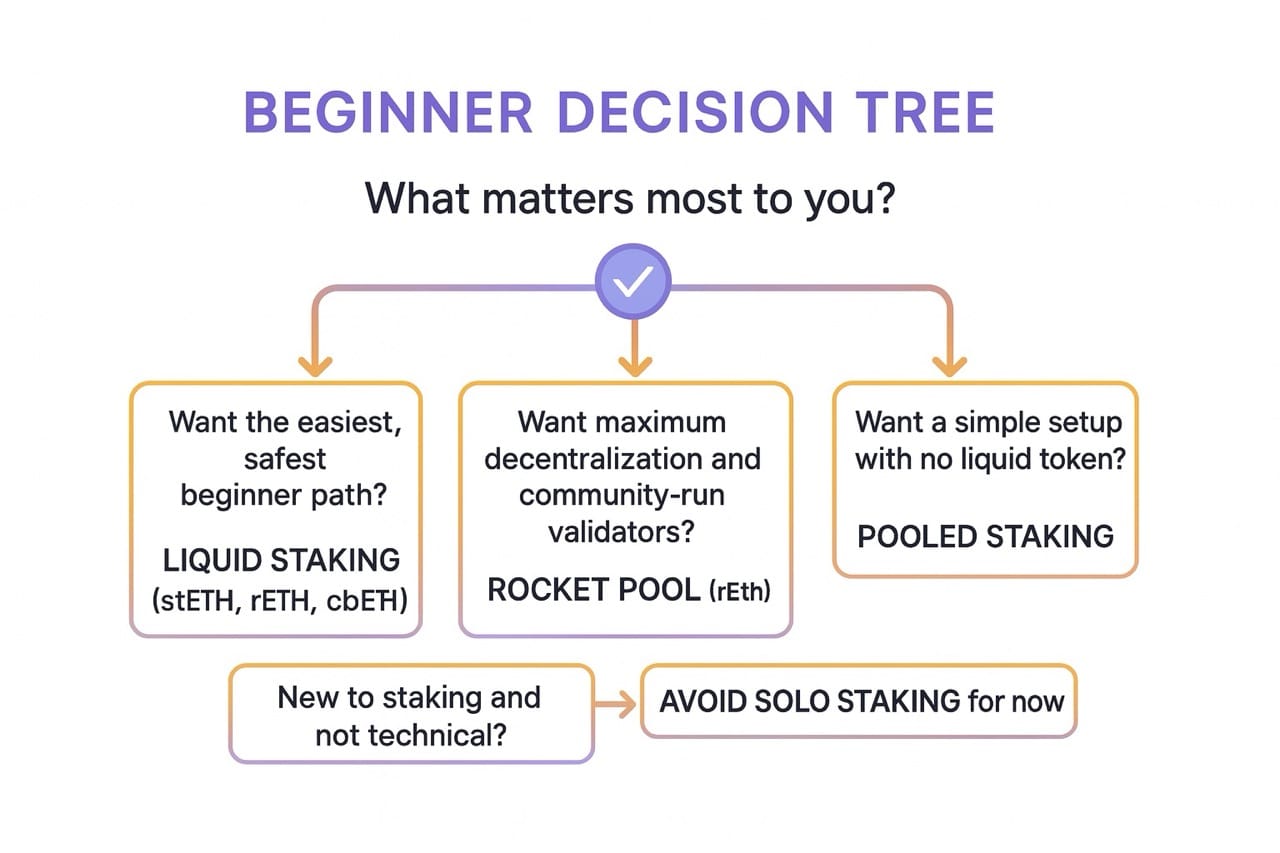
If you want more help deciding, use the visual decision tree included above.
Step 4: Make the staking transaction
Once you choose a service, open the official website, bookmark it, confirm your wallet is on Ethereum mainnet, check the gas fee, and once the conditions fit you, approve the transaction.
After a short wait, your staked ETH or liquid token will appear automatically.
Step 5: Track your rewards
Your rewards increase gradually over time. You can check them through the dashboard of the service you used — for example:
- Lido dashboard (for stETH)
- Rocket Pool dashboard (for rETH)
- Or a simple public explorer like beaconcha.in
These tools show how your staked ETH is performing and how your contribution supports the network.
Here’s a visual version of the steps so you can see the whole flow at a glance.
Before you make your first move, it’s worth knowing the few risks that matter and how to keep things safe from the start.
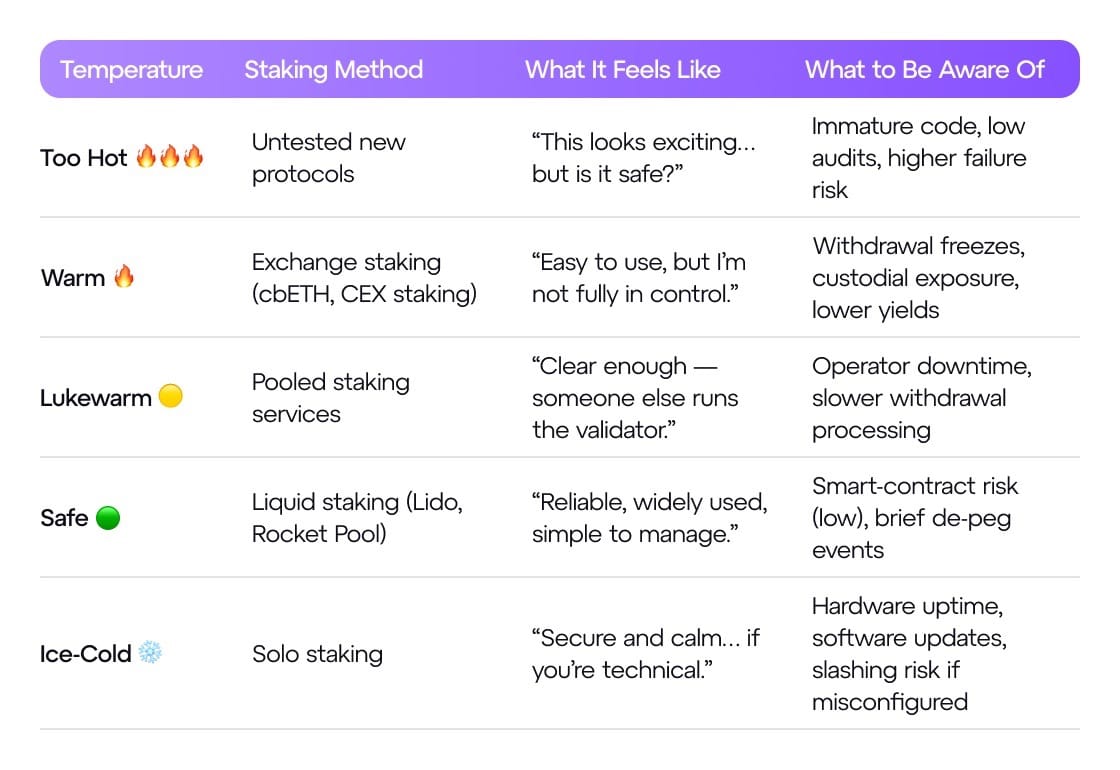
ETH Staking Risks Explained Simply
Staking is generally safe, but every method comes with a few things to understand clearly.
Smart contract risk
Liquid staking and pooled staking run on smart contracts. If the code has a flaw, it could be exploited. This risk is small with well-established services, like Lido and Rocket Pool, but it can’t be reduced to zero.
Custodial risk
If you stake through a centralized exchange, the platform—not you—controls your ETH. If withdrawals pause or the exchange has problems, you may not be able to access your funds right away. That’s why a lot of beginners prefer on-chain options.
Slashing
Validators can lose a portion of their stake if they go offline or break rules. This mainly affects solo stakers or poorly managed operators. In liquid staking and pooled staking, the risk is spread out and rarely affects users directly.
De-peg risk
Liquid staking tokens like stETH or rETH are meant to stay close to the price of ETH because each token represents staked Ethereum.
A “de-peg” happens when the token’s price drops slightly below ETH for a short period, usually during market stress or when a lot of people rush to sell.
These gaps are normally small and temporary, but it’s important to know the token’s price won’t always match ETH perfectly at every moment.
Beginner Staking Risk Thermometer
To make these risks easier to compare, here’s a simple risk thermometer that shows where each method sits on the spectrum.
Now that you understand the risks, the next question is how people actually arrange their first staking setup. Many beginners start with simple mixes that help them stay organized.
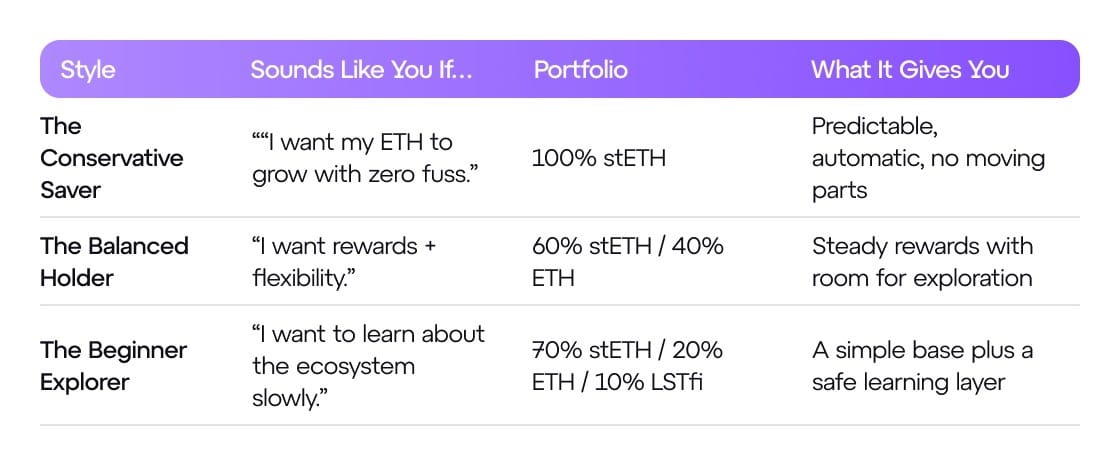
Simple ETH Staking Portfolios for Beginners
But how do people actually organize their first staking setup?
These three examples aren’t recommendations, but they give you a sense of what a first staking setup can look like in practice.
Conservative:
100% stETH
A simple, one-asset setup for people who want staking to run quietly in the background. Rewards update on their own, and there’s only one place to track everything. Easy to manage, low friction, and no extra decisions to make.
Balanced:
60% stETH/40% ETH
This mix keeps most of your ETH earning through stETH, while leaving a portion un-staked for swaps, gas fees, or trying new apps. It’s a good fit for beginners who want steady rewards but still like having room to move.
Beginner Explorer:
70% stETH/20% ETH/10% low-risk LSTfi (LSTfi = simple, low-risk apps built for staked ETH)
A small step beyond the basics. Most of the portfolio stays in familiar assets, while a small slice explores beginner-friendly tools built around staked ETH. The goal is to understand how integrations work without taking on extra complexity.
Each mix shows a different way first-timers ease into staking.
With your setup in mind, the last step is avoiding the mistakes that trip up many first-time stakers.
Mistakes Newbies Must Avoid
Most first-timers stumble on a few predictable points. These are the ones to look out for:
- FOMO staking
Trending services often carry the most uncertainty. Many new protocols don’t last long. Established options are safer for beginners.
- Using unknown platforms
New or unverified platforms may lack audits or liquidity. Age and reliability matter.
- Letting exchanges hold your keys
Convenient, but the exchange controls your ETH. If withdrawals pause, you can’t move your ETH until they allow it.
- Chasing the highest APY
APY is the yearly percentage you earn from staking. Very high APYs usually signal extra risk. In staking, steady and normal beats flashy numbers.
- Ignoring gas fees
Gas fees change hour by hour. Checking before you move funds saves money.
- Not bookmarking official links
A lot of new stakers click the first search result they see, and scam sites often pay to appear there. Bookmarking the official pages removes that risk and keeps this step simple.
Understanding these common slips puts you in a strong position as you start staking.
Conclusion
Staking ETH may look technical from the outside, but once you understand how the steps fit together, it becomes a simple, steady way to support the network and earn rewards. The beginner-friendly paths — liquid staking and pooled staking — are designed to run in the background once everything is set up.
If you have a wallet, a bit of ETH, and a trusted service bookmarked, you’re already prepared to begin. From there, it’s just following the path outlined in this guide: choose a method, make the transaction, and track your rewards over time.
Before you close this tab, ask yourself one question: What feels clearer now than it did when you started?
That clarity is all you need to move at your own pace.
FAQ
1. How much ETH do I need to start staking? As little as 0.01 ETH through liquid or pooled services.
2. Do I lose access to my ETH when I stake? No. With liquid staking, you receive a token (like stETH) that you can use anytime.
3. Can my staked ETH be stolen? Only if a service has a smart contract vulnerability or if you use a fake website. Stick to audited providers and bookmark links.
4. What happens if I stake on an exchange? The exchange holds your ETH. You earn rewards, but you lose withdrawal control.
5. Do staking rewards fluctuate? Yes. Most people earn around 3–4% per year, depending on network activity.
6. Can I lose money from slashing? Liquid and pooled staking spread risk so widely that user losses are extremely rare.
7. Is solo staking better? It offers maximum control but requires 32 ETH, hardware, and uptime. Not beginner-friendly.
8. What’s the safest way to stake for newcomers? Liquid staking with well-known providers like Lido or Rocket Pool.
9. What’s the easiest way to track my rewards? Use the dashboard of the service you picked or simple explorers like beaconcha.in.
10. What if stETH or rETH de-peg? The price may drift briefly during stress but usually returns to normal ranges quickly.
11. Should I restake my ETH? Only after you feel confident with basic staking. Restaking adds extra layers of risk and complexity.
12. Can I unstake anytime? With liquid staking you can sell the token instantly. With pooled or solo staking you may wait longer.